I noticed some time back that my Yukon was stumbling under loads, and tried several repairs and diagnosis techniques without success (I don’t have access to a scanner/reader), so I nursed it along until one evening it was really acting up, and as I looked in the rear view mirror to see if anyone was coming up on me I noticed a huge, continuous white cloud pouring out of my exhaust. I was a mile and a half from home, so I headed there, and went to bed. With dreams of mechanical failures floating in my head. bleh.
The next morning I started in on trying to figure out what was going on, and noticed the Coolant Reservoir was empty. Taking the radiator cap off showed there was very little coolant in the radiator. Great, I figured I blew the engine.
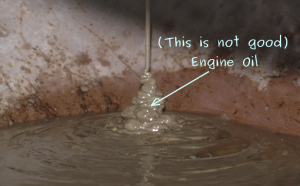
I checked the oil, and the first thing I noticed was the color tan, like paint Rommel would use on his tanks in his North Africa campaign. AND the level was very high, way up the dipstick. When I drained the oil, it looked like this (classic case of water and oil blended by the splashing crankshaft of a 4-stroke engine):
Some research on the internet turned up some info, most notably that this was not an unusual occurrence. The common thought was that since the cylinder head is cast iron and the intake manifold is aluminum (the lower part that bolts to the head) it’s the usual effect of dissimilar metals contracting and expanding at different rates, and under high heat, wildly different rates.
Most prices quoted by people who had taken it to a dealer were between $600 and $900, so I decided to take it on myself and use the money for drugs and hookers instead. Just kidding there.
A quick summary of what I found out on the internet (Google is your friend!):
- The intake manifold can be removed as an assembly (lower aluminum and upper composite plastic do not have to be disassembled)
- The radiator does not have to be removed (though getting at fasteners on the AC mount is more difficult)
- The AC unit can be left intact, that is, remove the four bolts (and electrical connectors) and move it over by the coolant reservoir without removing the hoses.
- A lot of people mentioned the ‘newer’ gasket available from GMC, unfortunately I went with an Edelbrock performance gasket (it failed, pictures below).
A quick summary of what I didn’t find out until I performed the work:
- The right (passenger side) valve cover has to be loosened considerably (or removed altogether)
- The Distributor and shaft assembly has to be removed (not as obvious as you might think)
- There are three bolts behind the power steering pulley that have to be backed out (as well as the obvious ones higher up) to loosen the AC mount/casting enough to get the manifold out (and access the front left (driver side) bolt in the intake manifold.
- The bracket underneath the Ignition Coil is fastened to the back of the right cylinder head, as well (after removing distributor, reach way back there and you’ll find a nut holding a ground wire to the cylinder head, under that is another that holds the back of the bracket).
Here’s a picture from when I started:
The procedure I used wasn’t tricky, as you look at the engine it’s pretty obvious what is in the way as you proceed. However, I don’t recommend anyone do this who has never worked on engines before. Once you have cleared the components in the way (Intake, AC, coolant hoses, throttle cables, electrical spaghetti, distributor, etc., etc.) the tricky part is loosening the bolts holding the casting that the AC mounts to from the front of the engine. I chose this method because I didn’t have a power steering pulley puller tool, and had read that it was possible (it is). There is a nut and one or two bolts at the top of this casting that are easy to get to, but there are three behind the pulley that are tough to get at. I recommend a combo wrench (spanner for you Brits ;’) that has the offset box (slightly angled). Take your time, you’ll need that and patience.
But once those fasteners are backed out, you can wiggle the AC mount back far enough to maneuver/lever your way through the rest…
I should note here what I did to remove some of the gunk left in the engine: Drained oil/water/sludge, and replaced drain plug but left old oil filter in place. Once manifold was removed, I used towels/whatever to remove all traces of water from top of block/pushrod-area. Then I used about a quart of kerosene to wipe down the area (letting the kerosene drain into the oil pan). After reassembling I put cheap 30w oil in and drove 5 to 15 miles, very easily, very light on the throttle. Then I did a proper oil/filter change after letting it drain overnight (I use synthetic oil). Coolant was a simple flush/refill.
This is what it looked like after removing the intake manifold:
After the surfaces were cleaned, new gaskets in place and silicone beaded on top of the block (front and rear horizontal surfaces), I re-assembled. Note the factory torque specs and order for the intake manifold, I believe they were 11 ft./lbs., and as typical, start from the middle and work your way out. I used two passes.
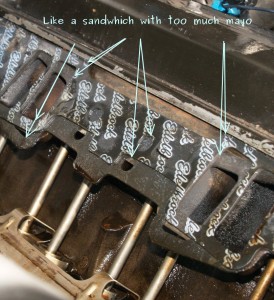
IMPORTANT NOTE: The above is slightly fictionalized. That’s because I had to do the replacement of the gaskets twice. The first set, Edelbrock Performace, failed after about 10 days. I noted the engine started racing, idling about 2300 RPM. Diagnosing it was a bitch because the leak was both on top of the manifold gasket and under it (inside block), so the real tell-tale was removing the hose that goes from the top of the right valve cover to the intake and noting a very strong vacuum there (as well as a dramatic change in idle speed). Disassembly revealed the Edelbrock gasket is actually two pieces, sandwiched together. pfft. Here’s a picture of what happened:

And for those curious, yes, I did follow the directions to the letter that were included with the gasket, and no, I didn’t ‘stack’ them. I ended up getting the factory gasket from the Chevy/GMC dealer, that’s been holding up fine. And the engine is running better then it has in years…
So, the reason for this post is two-fold, because I feel sorry for anyone that has to do this, and sorrier for anyone who has to do this twice in one month ;’)


Please clean the are where you want to put the gasket next time with a very fine sand paper. Eyery dirt or old parts of your previous gasket can damage the new one
What was the edelbrock gasket part number that you used? I have a set that I was going to try because the factory style plastic fel-pro gaskets constantly sag a create the internal vacuum leak. This will be my 3rd time changing the gaskets in 5 years. My yukon always has cylinders #3 & #5 affected. They misfire due to the oily air getting sucked into those cylinders from the lifter valley.
I was going to pin the gaskets or add center intakes bolts. I hate the 8 bolt vortec intake design. What a crappy design……why no center bolts?
Sorry, don’t have that part number anymore… But, the dealer/factory part that worked for me was sheathed in metal, similar to a head gasket.
I called the local chevy parts dept today and all of their gaskets are the crappy plastic ones embossed with silicone (the same kind that I have already replaced twice I think). My Edelbrock gaskets are #7235, which have the optional holes for center intake bolts. I was going to glue everything together with their gasgacinch gasket sealing compound in hopes of stopping them from sliding down over time. It’s real sticky stuff. Anyway, do you have a GM part number for the gaskets that you used recently? Thanks.
I am also contemplating drilling small holes in the heads and pining the gaskets in place near the center.
Sorry, was about a year ago, and although I saved the new gaskets packaging, once they didn’t fail within a month or so, I tossed them 🙁
I wonder if the reason for the difference in dealer parts is because of the year (difference)?
Holes would have to match intake manifold… Sounds hard. Maybe try another dealer?
Thanks……I’ll try and track down these steel rigid type gaskets. Maybe a gm performance parts gasket……
Hi Sam!
I’ve been meaning to write for a couple of months now to tell you “thanks” for the instructions…they were a big help to me when I had to do the job on my ’99. You did a great job on the page.
Anyways, I definitely owe you beers if you’re ever in Windsor, CO. Actually…if you’re ever in Windsor (armpit of Colorado), I’ll also owe you sympathy 😉
BTW, I’ll be following your instructions on fixing the 4wd switch pretty soon…
Thanks Erik! Eventually my transfer case started blowing a fuse (the #2 20-amp, side-of-dashboard) and it looks like the t. case motor that engages 4wd is bad. Did find one for $139 on Amazon, so the next ‘spare’ $139 bucks I have, I know where to spend it ;’)
I just had the head gasket and water pump replaced in my 99 yukon. now I am having a hard time starting it??????
That’s weird. Was it hard to start before you replaced the pump and head gasket?
WHY IS IT THESE 99 YUKONS HAVE THIS GASKET PROBLEM….I HAVE HAD DODGES FOR EVER AND NEAVER HAD PROBLEMS WITH GASKETS,,NOW I BOUGHT A 99 YUKON FOR THE WIFE AND WE HAD THE INTAKE REPLACED WHEN WE BOUGHT IT,,NOW I NOTICED THE ANTI FREZZE RESERVE IS EMPTY AND THE RADIATOR VERY LOW,,,THE OIL IS CLEAN,,I HAVE FOUND NO LEAKS OR ANTIFREZZE ON THE GROUND OR ON THE ENGINE…..SO IT MUST BE A GASKET OF SOME KIND AGAIN??? IS THERE A TEST YOU CAN HAVE DONE TO FIND OUT WHICH GASKET IT IS? THANKS
@JOEY: One way is to remove all the spark plugs and look for the one(s)that look fouled or wet. Another is to spray WD-40 (or similar?) around the area where the intake manifold meets the cylinder heads (the problem with this one is that the leak may be on the underside — in which case it will create a lot of vacuum in the engine block). HTH.
I have a gmc savanna conversion van with the plastic intake gaskets. The engine is leaking out intake on drivers side closest too front. The van is in good to great condition otherwise. You can start it, drive it, until it starts leaking too bad. If someone in the st.Louis area would be interested in buying it and repairing, please e-mail me at [email protected].
I have a 99 Yukon 5.7 liter vortek leaking coolant.. it’s coming from the gasket at the front of the engine..it’s difficult to see butI shined a light around and saw a puddle of liquid in one of the depressions.I tightened the only 2 manifold bolts visible to 90 lb/in.they were so loose I could almost turn them with my fingers!theleak stopped for about 1000 miles.the engine only has 66000miles on it.I’m 82 years old and don’t relish the idea of putting a $2000 door on a $50 garage so to speak..Bars leak ?
I think that would be my next choice, if torquing them didn’t help. I’ve used the standard Bars Leaks and found joy. I’ve used the Aluminum one as well (actually required on some early-model water-cooled motorcycles after rebuilding).